Documentation
From your first website check to a working tool on your site. Follow the workflow or jump to a field, connection, or troubleshooting topic.
Start here: the complete workflow
A WebMCP tool describes a task an agent can perform on your website, the inputs it accepts, and the result it returns. The Workbench helps you discover, define, test, and install those tools. It does not create a working search engine or website function for you: your API or JavaScript function supplies the actual behavior.
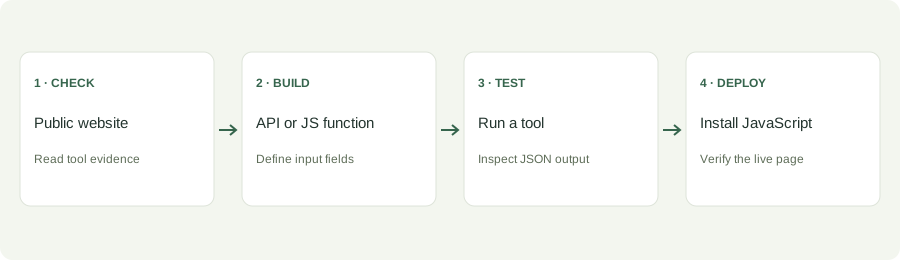
- Website checker: inspect a public page for existing tools.
- Tool builder: describe a task and connect an existing API or website function.
- Playground: open the website and inspect tool execution results.
- Export & deploy: download your saved JavaScript and install it on your site.
Website checks and API tests are free. Optional AI recommendations cost 10 credits per successful AI scan; scanner-only results and failed AI calls are free. Generating a tool export costs 5 credits. Sign in through Account & credits for paid operations and saved account exports. Reopening a saved AI result does not spend credits again.
New to the workflow? Watch the five-step Workbench demo, then use this reference while configuring your own tool.
1. Website checker
Choose the page to check
Enter the full public HTTPS URL of the page where agents should find a tool, such as https://shop.example.com/products. Check the actual published page, rather than an admin dashboard, localhost URL, or site editor. A scan covers this page; it is not a crawl of your entire website.
- Open Website checker, paste the page URL, and choose Check website.
- Wait for the source and rendered-page checks.
- Read the tool list, evidence, coverage, and limitations together.
Understand the result
- Source declarations: registration code or annotated forms found in the page’s public source. This does not prove the code ran.
- Registered tools: tools exposed when the page loaded in the checker’s browser. Detection does not prove successful execution.
- No tools found: you can still build a tool using an existing public API or function. Delayed registration, login requirements, and inaccessible scripts can also hide tools.
- Limitations: explain missing coverage or unsupported behavior. Review these before drawing conclusions.
Recent checks are stored in this browser. For the scanning method and limits, read How our checks work. To investigate a tool’s behavior, continue to Playground; checking never calls discovered tools.
2. Tool builder: find ideas and reopen history
Open Tool builder and select Find tool ideas. Enter a public page URL. The optional AI recommendation setting uses public page evidence to propose tool names, descriptions, inputs, outputs, and connection steps.
- Start with a narrow task: “search products” is easier to connect than “manage the entire shop.”
- Read the recommended connection steps and confirm an endpoint or function actually exists.
- Detected JavaScript functions include names, parameter names, and source locations. They are candidates, not verified callable functions. Scanning does not execute them.
- Public assignments on window/globalThis may be connectable. Module-private functions require an adapter; handler references or declarations need developer review.
- History reopens your latest 20 successful AI scans without another AI call. Older results may not contain JavaScript evidence added after they were created.
AI can suggest a workflow, but it cannot supply missing credentials, guarantee a function’s purpose, or turn a private API into a public one. Use the connection checklist before generating code.
3. Before building: get your connection details
How to find an API URL
- Ask your website developer or consult the API documentation for a public, read-only JSON GET endpoint.
- On your own site, open browser Developer Tools → Network. Filter for Fetch/XHR, then perform the search you want the tool to reproduce.
- Inspect the request URL, method, query parameters, and JSON response. For example, a request to /api/search?q=backpack identifies the path /api/search and parameter q.
- Check whether the request requires login, cookies, an authorization header, or a secret API key. The builder’s API connection supports public GET requests without authentication; a logged-in browser response alone is not proof it is public.
- Confirm that the endpoint belongs to the website origin and that it returns JSON rather than an HTML page. Share the details below with your developer if you are unsure.
Get these five things: website origin, endpoint URL without a query string, query parameter names, one sample JSON response, and the path to the result array. For example: https://shop.example.com, https://shop.example.com/api/search, q, a response with products, and products as the result path. These example domains are illustrative; replace them with your real website.
How to get a JavaScript function
Ask your developer for the public function path, input types, argument order, return value, and whether it changes data. A button label or a name found in a scan is not enough. The exported adapter needs a function accessible on window or globalThis on the target website.
// Website code: expose your existing implementation publicly.
window.shop = window.shop || {};
window.shop.searchProducts = async ({ query, limit }) => {
  return existingSearchImplementation(query, limit);
};
This adapter example assumes your site already provides existingSearchImplementation. A private ES module function cannot be called by name from the export until your developer exposes an intentional public wrapper. Do not expose passwords, API secrets, or privileged administrative actions.
4. Tool builder: define the tool and its inputs
Step 1 — Define your tool
| Field | What to enter | Example / how to find it |
|---|---|---|
| Tool name | A stable lowercase name, 3–64 characters, using underscores. Start with a letter. | search_products; avoid spaces and vague names like tool1. |
| What does the tool do? | Describe the task, when to use it, and what it returns (20–1,000 characters). | Search the public product catalog by phrase and return matching product names, prices, and links. |
| Input name | The property an agent sends. Use a clear, unique name. | query or limit. For an object-based JS function, match the properties it expects. |
| API parameter | The query-string name your API expects; relevant to API connections. | Input query maps to API parameter q. Obtain it from API docs or Network requests. |
| Type | Match the value the implementation accepts. | String for phrases; integer for counts; number for decimals; boolean for true/false; choice for a fixed list. |
| Description | Explain each input so an agent can choose a useful value. | Words to search for in product names. |
| Required | Enable if execution must receive this input. | Require query; make limit optional if your implementation has a sensible default. |
| Default | A valid fallback value when the input is omitted. | 10 for an integer limit. A default must match its type and any configured bounds/options. |
| Minimum / maximum | For numeric inputs, set valid lower and upper bounds. | limit: minimum 1, maximum 20. |
| Choice options | List only values the implementation accepts. | relevance, price_low, price_high for a supported sorting input. |
Add only inputs your API or function actually uses; up to 12 fields are supported. Remove unused fields. For positional JavaScript calls, their order is the argument order.
Example inputs
{
  "query": "backpack",
  "limit": 2
}
Define query as a required string and limit as an optional integer with default 10 and bounds 1–20. Then continue to Connect & test.
5. Tool builder: connect a public JSON API
Step 2 — Public JSON API
Choose Public JSON API under Connection type. Use a same-origin public HTTPS endpoint that reads information.
| Field | What to enter | Example / how to find it |
|---|---|---|
| API URL · GET | The full endpoint URL without credentials, query string, or fragment. | https://shop.example.com/api/search — not the storefront search page returning HTML. |
| API parameters | Map each defined input to the endpoint’s parameter name. | query → q and limit → limit produce ?q=backpack&limit=2. |
| Advanced: output path | A dot-separated path to the relevant response value. Leave blank if it is already the root. | products for {products:[…]}; data.items for {data:{items:[…]}}. No array indexes. |
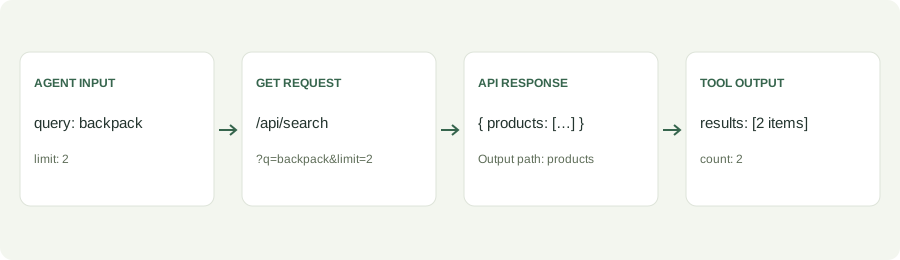
Worked search example
GET https://shop.example.com/api/search?q=backpack&limit=2

{
  "products": [
    { "name": "Daypack", "price": 49, "url": "/products/daypack" },
    { "name": "Trail pack", "price": 79, "url": "/products/trail-pack" }
  ]
}
Use output path products, output format Results list + count, maximum results 2, and output fields name,price,url. The formatted result contains those two items and a count of 2; it does not represent the total number of matches in the catalog.
Enter representative test inputs and choose Run test · free. Inspect the response and selected output. Test a phrase with matches and a phrase with no matches. Correct the mapping before moving to Generate & export. A successful server test does not guarantee the published page’s browser permissions or site policy will allow execution.
6. Tool builder: connect a website JavaScript function
Step 2 — Website JavaScript function
| Field | What to enter | Example / how to find it |
|---|---|---|
| Website URL | The public HTTPS website on which the function and adapter will run. | https://shop.example.com/products; generated code is restricted to its website origin. |
| Public function name | A callable dot-separated path exposed by website code. | window.shop.searchProducts. Do not enter a function body, parentheses, or a module import. |
| Pass inputs as | Choose the calling convention the function actually uses. | Object: function({query,limit}); separate arguments: function(query,limit), in input field order. |
| This function only reads information | Enable only when the function does not change stored data or perform a transaction. | Catalog search is read-only; adding to cart or saving information changes data. |
| Output path | Choose the returned value to expose, if nested. | products when the function returns {products:[…]}. |
// Object mode: query and limit are named input fields.
window.shop.searchProducts({ query: "backpack", limit: 2 });

// Positional mode: define query first, then limit.
window.shop.searchProducts("backpack", 2);
The builder does not execute your website’s functions on its server. Test after exporting and installing the adapter on the website, using the registered-tool controls in Playground. A function discovered in an AI scan still needs this runtime test.
- Load your website function before the generated script.
- Both ordinary return values and asynchronous Promise results are supported.
- The adapter preserves the function’s owning object as this.
- When read-only is unchecked, the export asks for confirmation before calling the function.
- A timeout stops waiting for a result. It cannot stop all underlying JavaScript or undo an action that already happened.
7. Output settings and generating an export
| Field | What to enter | Example / how to find it |
|---|---|---|
| Output format | Raw response returns the selected value; Results list + count returns a formatted list. | Use raw for a detail object; list + count for an array of search results. |
| Maximum results | Limit list output to 1–20 items; default 10. | This caps returned items; also send an API limit parameter if your endpoint supports one. |
| Output fields | Comma-separated fields to retain in each list item. Blank retains all fields. | name,price,url; match the JSON property names exactly. |
| Timeout · seconds | Choose 1–120 seconds; default 15. | Use enough time for your endpoint or function, without making agents wait unnecessarily. |
Step 3 — Generate & export
- Review the name, description, inputs, connection, and output mapping.
- Sign in and make sure your wallet has at least 5 credits.
- Choose Generate & export. One generated export costs 5 credits.
- Download the JavaScript and follow the installation checklist.
Generating code does not publish it to your site. Saved exports can be downloaded again from Export & deploy. If you change the tool definition, generate a new export and replace the installed file with that version.
8. Playground: execute and inspect tools
Open the website
In Playground, enter the published page URL and choose Open website. Follow any sign-in requirement shown. Opening stops after 60 seconds; sessions close automatically after five minutes. The screenshot preview updates periodically and does not forward clicks to the website.
Test installed tools
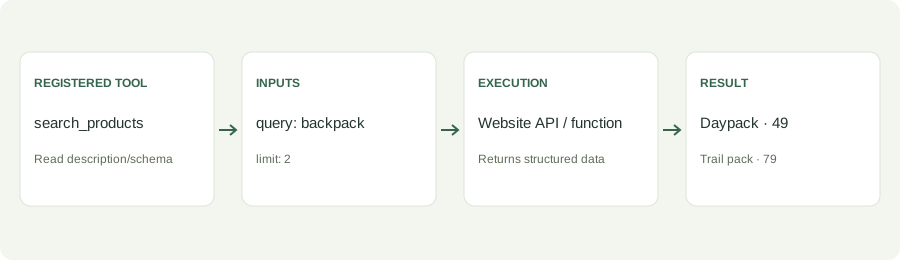
- Expand Registered WebMCP tools, then select your tool.
- Read its description and input schema; supply valid input values.
- Review the execution/permission confirmation. A tool may change website data; only run actions you intend to perform.
- Run it and inspect the returned output and inputs used. For your search example, confirm backpack returns the expected product list.
Use this route for installed JavaScript-function exports. If the tool is absent, check script loading and registration first. The temporary browser may block unsupported requests or lack a logged-in site session.
Try a temporary API search tool
The Connect your search panel inserts a public read-only API search tool into this session. Choose a saved API search tool or enter the tool name, description, API path, search parameter, and optional result-array path. Confirm the endpoint is public and read-only, insert the tool, then enter a search phrase and result limit (1–20).
Temporary injection supports API search tools, not JavaScript-function exports. It does not modify your published website. Remove the injected tool or close the session when finished. The temporary search runs without an AI call and stops waiting after 15 seconds.
9. Export & deploy: publish and verify
Download and load your script
- Open Export & deploy and choose a saved export from the dropdown.
- Download the JavaScript. Upload it through your normal website deployment process.
- Copy the script snippet and adjust its path to the file’s actual published URL.
- Choose your hosting platform under Install on your website and follow its instructions.
- Publish the updated site, clear relevant caches, then open the JavaScript URL to confirm it returns the file.
<script src="/search_products.js" defer></script>The example assumes the file is available at your site’s root. A subfolder or externally hosted asset needs its actual URL. For a JavaScript connection, load the implementation before the generated adapter. Include the adapter once on each page where the tool should be available.
Hosting pointers
- Vercel / Next.js, Netlify, Cloudflare Pages, Render: include the file in public assets and load it from the shared layout. Deploy the complete site.
- GitHub Pages: include a repository prefix when needed. An API must be hosted separately from static Pages.
- WordPress: enqueue the file from a plugin or child theme using its actual asset URL.
- Shopify: upload it under theme Assets and load it through the theme’s Liquid asset URL.
- Webflow, Wix, Squarespace: use supported custom-code insertion with a public hosted script URL. An iframe embed does not register a tool on the parent page.
- Firebase, Amplify, S3 / CloudFront, other hosting: include the file in your existing deployment and serve the site over HTTPS.
Platform-specific snippets and official setup links are in the installation selector. Your hosting plan must permit custom code. Site Content Security Policy must allow the script and any API request; ask your developer to make a narrow policy change rather than disabling protections.
Verify the published version
- Run Website checker on the published page.
- Confirm the tool is registered and its schema matches your inputs.
- Open that page in Playground and execute a representative input.
- Inspect the result and an empty/error case before relying on it.
10. Browser support & setup
WebMCP availability depends on the browser and its enabled capabilities. Opening an ordinary webpage or loading an adapter does not by itself enable WebMCP. Check the current official Chrome WebMCP setup guide for supported versions, preview access, and configuration instructions.
- Use the supported browser/configuration described by the official guide.
- Open your published HTTPS page after setup; reload after changing browser settings or installing the script.
- Ask your developer to check whether document.modelContext is available and whether tool registration succeeds.
- The Workbench’s temporary checking browser can differ from your visitors’ browsers. A tool detected here is not proof of universal browser support.
For the underlying concept, read What is WebMCP?. Browser requirements change, so follow the linked official instructions for exact setup.
11. Troubleshooting and developer handoff
| Field | What to enter | Example / how to find it |
|---|---|---|
| Private or unsupported network address | Use a publicly reachable HTTPS website. Localhost, private IPs, and DNS results pointing to blocked addresses are rejected. | Ask your developer to check public DNS and hosting; AI cannot bypass network restrictions. |
| API test returns HTML or an error | Check method, URL, public access, and response content. | A storefront /search page is often HTML. Request a documented JSON endpoint. |
| Empty or malformed output | Check the response shape, result path, and output field names. | Use products for a products array; leave path blank for a root array. |
| JavaScript function is unavailable | Check public exposure, spelling, origin, and script order. | window.shop.searchProducts must exist before the adapter loads; module-private functions need a wrapper. |
| No registered tools | Check asset URL, browser support, registration errors, and site policy. | An uploaded file without a script tag does not run. Check the published page, not the editor. |
| Timeout | Check endpoint/function performance and the configured timeout. | A timeout does not undo writes. Investigate side effects before repeating an action. |
| Not enough credits | Check your account wallet. | AI scans cost 10 credits; new exports cost 5. Free checks and tests do not require an AI scan. |
What to send your developer
- The published page URL and the exact task you want agents to perform.
- API request method, endpoint, parameter names, and a redacted example JSON response; or the public JavaScript function path, signature, and return shape.
- Each input’s type, required/default rules, and valid limits.
- Whether the operation reads or changes data, and what permissions it needs.
- Your hosting platform, generated filename, and the observed error/result.
Do not include secret keys, passwords, or private customer records. For help with the Workbench itself, contact us. See the privacy policy for scan and account data handling.
12. Still need help?
If you still need help checking your website, configuring a tool, testing results, or installing an export, reach out through our Contact us page.
Include the page URL, the step you are working on, and any error message so we can understand the issue. Keep passwords, API keys, and private customer information out of your message.
Contact us